Specific Field Indexing


Click on a Topic Link Below for Detailed Information and Screenshots

 
Specific Field Indexing is an extremely powerful tool to extract contacts from your logbook that meet certain arguments and then perform various operations on those contacts such as bulk QSL label operations, updating QSL status en masse, printing the list, saving the list to a file, exporting to an ADIF file or creating a new logbook containing only those contacts.  In the following paragraphs, we will take you through various operations, from opening the SFI (Specific Field Index) to performing various search tasks and subsequent operations.  These operations are also detailed in the Help file that is included with ProLog.

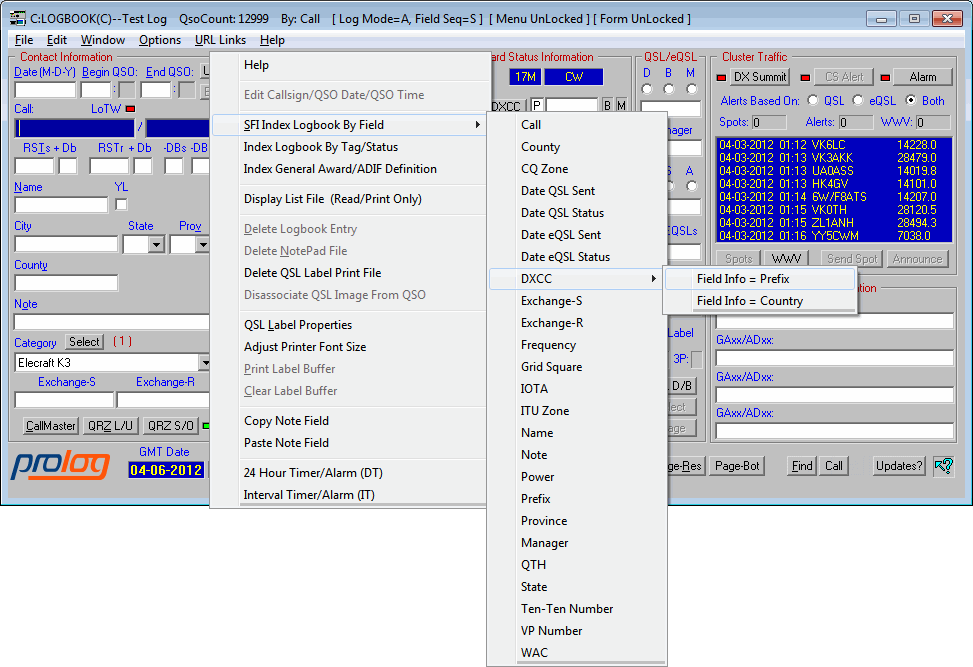
The first question that arises is how does one open the SFI.  From the primary logging form, right-click on any background area of the logging form to open a popup menu and select SFI Index Logbook by Field.  This will open a sub-menu where you must select the field that you want ordered in ascending order.  Most of the time, you will select Call which will cause the resulting list to be arranged in ascending alphabetical order by the callsign.  If you had selected Name, the resulting list would be arranged in ascending alphabetical order by the operator's name.  The image below shows the SFI menu and the various fields that can be selected to index the resulting list:


Specific Field Index Menu


After selecting the indexed field, the SFI Filter form opens.  It is from this form that you select one or more arguments to fulfill your search parameters.  Immediately below this image is a description of each filter panel.
 

Specific Field Index Filter


"Order List By" Panel

This Order List By paenl permits you to order the resulting SFI list by Callsign, QSO Date or Log Field Data (ascending alphabetical or numerical order).  Additionally, immediately to the right of the Callsign field is a field where you may specify to extract only those calls that contain specific stroke data.  This would be the same information that you entered into the Stroke field in the primary logging form.  For example, if you want a list of all your "mobile" contacts, simply enter the letter "m" or "M" into the Stroke Filter field and click on the Begin button.  Only those contacts with an "/m" and/or "M" appended to the call will be displayed.

If you have entered a purely numeric argument into the logging form field to be SFI'd, the +/- entry field adjacent to the "Log Field (Numeric Sort)" radio-button will be activated.  When you select that radio-button you can additionally specify a range of values that should comprise the list.  For example, if you want to display a list of CQ Zones from 10 through 20 simply enter "15" into the CQ Zone field of the logging form, then SFI index by the CQ Zone field.  When the SFI filter menu is displayed, choose the method of ordering, then enter "5" into the +/- entry field and click the Begin button.  The displayed list will contain only the contacts in CQ Zones 10 through 20.


"Use Case" Checkbox

The Stroke Data field in the logging form is restricted to alphanumerics.  Alphabetic characters may be entered in either upper of lower case.   We prefer the flexibility of entering either upper or lower case characters, but if you feel that upper case is all you want or will ever use, then you can instruct ProLog to only use upper case by activating that checkbox in the User Preferences section of the "Configurations" menu. 

If you do choose to use both upper and lower case for your stroked data then you must instruct ProLog when to apply case sensitive searches on stroked data through the activation of the "Use Case" checkbox.   Entering an "m" in the stroke data entry field without activating the "Use Case" checkbox, will find contacts with stroked "m" and "M".  Activating the "Use Case" checkbox will find only those contacts with a stroked lowercase "m".


"QSO Date Filter" Panel
 
Use the "QSO Date Filter" to establish a range of dates that you wish to include in the SFI list.   Should date information be entered, only those contacts between and including the entered dates will be presented to the remainder of the filter processing.


"Tag Filter" Panel

The "Tag Filter" panel permits you to select any tag(s) that you wish to include in the search.  Additionally, using the "Match Method" "OR" or "AND" radio-buttons, you can specify how you wish ProLog to apply those tag selections.  If you select the "OR" operator, ProLog will list any contact that contains one or more the tags shown in the tag selection.  If you select the "AND" operator, ProLog will list only contacts that the tag complement is exactly as shown in the tag selection. 

Normally the Tag filter is used to list those contacts that meet the filter requirements, however if you check the "Omit Tag Matches From List" checkbox, the opposite will occur and ProLog will list all contacts except those contacts that match the tag filter criteria. 


"Category Filter" Panel

The "Category Filter" panel permits you to select any category or categories that you wish to include in the search.  Additionally using the "Match Method" "OR" or "AND" radio-buttons, you can specify how you wish ProLog to apply those tag selections.  If you select the "OR" operator, ProLog will list any contacts that contain any of the Categories selected from the Category pulldown list.  If you choose "AND" operator, ProLog will list only those contacts that contain all of the Categories selected from the Category Selection pulldown list. 


"QSL Status Filter" Panel

The "QSL Status Filter" panel permits you to select a specific QSL Status that you wish to include in the search.  Normally this filter is used to include contacts that meet the filter requirements, however if you check Omit Status Matches From List, ProLog will exclude those contacts from the list that match the filter selection.  This is particularly useful when you want to omit previously submitted contacts from a given award like the 1010 award.  For example, whenever you submit a list of 1010 numbers, you would set the "S" status for submitted, then on a future submission list, request that contacts with the "S" status be excluded which will ensure that only your new 1010 contacts will be listed.


"Specific Data Search (WildCard)" Panel

If you entered a specific data argument in the primary logging form field being indexed, then the radio-buttons associated with "Specific Data Search (WildCard)" panel will be activated.  It is important to understand how choosing or not choosing a wild-card operation can effect the gathering of common data when you are searching for specific data.

If you do not choose a wild-card operation, only contacts that have the exact data content entered into the field will be included in the list.  For example, if you put "Ed" into the Name field, then SFI'd by the "Name" field, only those contacts with "Ed" in the Name field will be displayed.  Contacts containing "Edward", Edwin" or Edison, etc., will not appear in the list.   This search is not case sensitive, that is, the list will contain "ed", "ED", "Ed" or "eD".

If you choose to use the wildcard search, two methods are available.  Using the example above, if you select the From Start of Field (xxx.....) wild-card method, only names starting with "Ed" will be included in the list which would encompass names like "Edward", "Edwin" and "Edison" but not a name like Fred" or "Ted".  This search is also not case sensitive. 

If you select the Within Field (..xx..xx) wild-card method, any name containing "Ed" anywhere within the name will be included in the list.  Thus, names like "Edward", "Alfred", "Fred", "Manfred", "Mildred", etc., will be included in the list.  This search is also not case sensitive.


"Band/Mode Filter" Panel 

The "Band/Mode Filter" panel permits you to select a specfic Band and/or Mode of interest.  The Band pulldown list defaults to "ALL".  If you wish to specifiy a single band, select if from the list.  The "Mode" selection consists of 3 radio-buttons and a pulldown window.  Modes are divided into two categories, the standard modes (PHONE, SSB, CW, RTTY, SSTV, AM, and FM) and the currently supported 65 Digital Modes.  When the "All Modes" radio-button is selected, all standard and all digital modes will be included; the Mode field is disabled when this radio-button is selected.  When the "Standard" radio-button is selected, the Mode pulldown list will contain the list of standard modes previously listed and only contacts using those modes will be displayed.  Additionally, the user has the option of selecting all of the standard modes (the Default) or selecting a specific mode.  Note: Selecting the "Phone" entry will include the SSB, FM and AM modes.  When the "Digital" radio-button is selected, the Mode pulldown list will contain a list of the supported digital modes.  The user has the option of listing "ALL" of the digital modes (the Default) or selecting a specific Digital Mode. 


"QSO Record Filter" Panel 

This filter has two options: Omit QSO's Without Field Data and Omit QSO's Without QSL Images. 

  Omit QSO's Without Field Data:

When you index on a logging field it is quite possible that some QSO's in the list won't have any data entered in that field.  Since the SFI sorts the index field in ascending order, you could theoretically wind up with a list containing dozens or more contacts with no data in that field.  In that case you would have to scroll downward though the list to locate the first record with data in that field.  By selecting Omit QSO's WIthout Field Data, those contacts with no data in the indexed field are ignored and do not appear in the resultant list.  The first entry in the list will contain data.

  Omit QSO's Without QSL Images:

As you can imagine, finding contacts in your logbook that have an image attached to them could be a tedious task: either scrolling through your log in the primary logging form watching for the Image button to become active or switching to Page Mode and scrolling looking for the exclamation point in the eQSL column.

To locate contacts that have an image attached to them open the SFI, set any filters you desire and check Omit QSO's Without QSL Images.  Within the limits set by any other filters you set in the SFI, only contacts with an image file attached to them will be displayed in the resultant list. 


Generating and Displaying the SFI List
 
Once the SFI filter parameters have been established, click the Begin button to compile the list.  The first three columns of the SFI list contain the Callsign, Date and Field Information.  The order of these first three columns is variable with the leftmost column containing the primary data field determined by the previously selected "Order By" selection.   The Time, Band, Mode, QSL Status, eQSL Status and Variable Data field will follow these columns in that order.

The "Variable Data" column displays selectable data from most of ProLog's data fields.  Which fields will be displayed are selected using the "VariList" editor.  The "VariList" editor is activated by right-clicking anywhere in the SFI list display and selecting the ""VariList" Editor" which will display the "VariList" editor dialog box.

Regardless of the indexing format chosen (Call, Date, or Field Information), the "Field Information" column will contain the data from the selected logging form field.  Due to proportional character spacing, the "Field Information" is on average 20 characters wide.


Specific Field Index Filter Examples  

The following images of the SFI will demonstrate various filter settings to give you a better idea of how it works.  Obviously we can't demonstrate every possible filter setting, but you should have a better understanding after reviewing these examples.


This SFI has a QSO Date filter setting of 01-01-2011 to 12-31-2011 resulting in a list of all contacts for the year 2011. The list is ordered by Callsign.


This SFI has a Band/Mode filter and will result in a list of all CW contacts on 20M. The list will be ordered by QSO Date.


This SFI has a Tag filter of "QRP", "YL" and "SF" (Split Frequency) with a Match Method of "OR". It will return a list of contacts that contain a QRP tag or a YL tag or a SF tag, either any one of the tags or any combination of the tags. If the "Match Method" was set to "AND", it would only return a list of contacts where the contacts have all three tags set. QSO's with only one or two of the tags (or QSO's with additional tags) would not meet the match criteria


This SFI filter has QSL Status set to Routing = "W", "D", "B", "M" (Worked, Direct, Bureau and Manager) and Status = "R" (Received). This is a fairly common filter setting which will return a list of every contact worked that you have received a QSL from.


Advanced Filter Examples


The SFI has the ability to create a list where specific data exists in a particular field.  To do this, one needs to select the field of the information desired, enter the data they wish to use as a filter in that field in the primary logging form and then use the SFI to create that list.  Let's create a list of contacts where the operator has the name "Ed".  Go to the logging form and if there is any data displayed, clear the logging form.  Place the cursor in the Name field and type "Ed".  Right-click on the gray area of the logging form and select "SFI Index Logbook by Field" menu option.  A second menu will open.  Select "Name" from that menu.  Doing this tells the SFI to use the data in the Name field of the primary logging form to create the list. 


This SFI will return a list of all contacts where the operator name is "Ed".  It is not case sensitive so it will also return "ed", "eD" and "ED".  However, if you select the "From Start of Field (xxxxx.....)" radio-button, it will return all contacts where the operator name BEGINS with "Ed" (again, not case sensitive).  It will return "Ed", "Eddie", "Edna", "Edward", etc.   If you select the "Within Field (...xx..xx...)" radio-button, it will return all contacts where the operator's name CONTAINS "Ed".  So in addition to the variations of "Ed", "Eddie", etc, it will also return "Alfred", "Fred", "Mohamed", "Pedro", "Ted", etc.

Note: "Log Field (Information Sort)" should be used for text data and "Log Field (Numeric Sort)" should be used for numeric data.


The following is an example of a numeric filter with a +/- range. Suppose you want to generate a list of contacts you made using 5 to 25 watts. In the primary logging form, enter "15" in the Power field.  Right-click the gray area of the logging form and select "SFI Index Logbook by Field".  A second menu will open. Select "Power" from that menu.  When the SFI opens you will see "15" in the "Specific Data Search" panel. In the "Order List By" panel click the "Log Field (Numeric Sort)" radio-button as the Power field is a numeric value. In the +/- field, type "10". When you click Begin the resulting list will contain all contacts where the power is 15 watts, +/- 10 watts, or in other words, 5 - 25 watts.


While we can't demonstrate every capability of the SFI, at this point you should have a fairly good understanding of the operation and power of the SFI.  All SFI operations produce a Page Mode list.  This list is temporary and unless you specifically save this list using the right-click menu from the Page Mode list, it is deleted when you close the resulting list. The list does not modify you data in any way unless you select a specific operation from the resulting list popup menu.  This means you can experiment with the SFI to your hearts content.  We recommend you do that until you are quite comfortable in its operation.


SFI Resultant List Operations


The SFI will produce a spreadsheet list of all contacts meeting the settings set in the SFI filter.  Right-clicking anywhere on the list will open the SFI Results Menu. 


From this menu you can perform batch QSL status operations, print QSL labels, save the list to a file, print the list or export the list to a ADIF file or a logbook file.  The Logbook file is a temporary file that is used to extract contacts from your logbook to create a new logbook containing only those contacts.  An example of this type of operation might be if you wanted to create a separate logbook for QRP operation and wished to extract all your previous QRP operations from your primary logbook and use them to create the new logbook. Note: The extraction process does not delete the contacts in the resulting list from the logbook used to create the list. 


Contact Information
Tech Support and FAX --
Postal Address -- 5560 Jackson Loop NE -- Rio Rancho, NM 87144

For Comments or Questions, Please Use Our Contact Form


ProLog | Order Now | What's New? | Products and Services | Support and FAQ's | Links
 Product Reviews | User Feedback | Downloads | Contact Us | Discussion Forum