![]()
Forget your user name? Lose your password? Has your computer or online account been hacked? Now, a simple-to-use tool has been developed whereby you will never forget or lose any critical information again and feel comfortable knowing your important data is securely stored from prying eyes. How? Introducing CredLock™, the Credentials Lock vault.
The CredLock program together with its highly encrypted database, has been designed to be used with fixed or removable flash media. Access to your data is protected by a master password; without it, no one can gain access to your CredLock system database. In fact, after a number of unsuccessful password entry attempts you can request that CredLock automatically digitally shred your database file leaving the un-authorized user with zero remnants of your private information. Even scanning the disk using special tools will not yield any useful information.
CredLock's database permits you to store records of various content including internet websites complete with logon credentials, credit card information. We also have a record type that we have named "DigiDex"™ much like the old Rolodex™ system. You can also keep track of personal property and collectibles using our property and miscellaneous record types.
A brief overview of the CredLock record types and features follows, however for a more detailed tutorial on the various record operations and features, the reader is referred to the CredLock Operations Manual.
CredLock Features List
CredLock will run under all versions of Windows including WinXP(SP2), Vista-32/64, Win7-32/64, Win8-32/64, and Win10-32/64.
Highly encrypted information database plus 256 bit AES encryption based on media selection.
Master system password protection for system access.
Automatic digital shredding of database and image files when an unknown master password is entered a user-selectable number of times.
Procedures are in place for CredLock to recover your Master Password should it be forgotten. (The "911" button) (Refer to the User Manual For Details)
Create unbreakable User Names and Password's up to 50 characters in length. (Mixed alphanumeric, upper case, lower case, special characters)
Auto-Connect to your favorite websites and with a few clicks automatically enter your user name and password.
User selectable auto-alert when a given user name and/or password has been in use for a specific period of time.
Five record categories keep track of your Internet Sites, Personal Contact Information, Credit Cards, Personal Property and Inventory/Collectible information.
Unobtrusively sized main window that can remain on the desktop or the task bar for immediate access.
Selectable positioning of main and sub-windows.
Customize the foreground and background color of record data fields and pull-down lists.
Scan website records for duplicate user names and/or passwords to avoid repetitive use of the same character string's.
Enter the answers for up to three challenge questions that may be asked when the website detects a questionable sign-on.
Database/Image backup to separate media. (Primarily for restoration following a protective digital shredding of the database).
A full-featured demo of CredLock is available for download in the "Downloading the CredLock Demo Program" section. During, or after your demo period, purchase the CredLock full-use license for the nominal fee of $15.00 via our SECURE ORDER FORM.
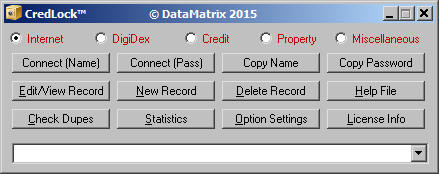
CredLock Main Screen
The top
line of the CredLock main screen permits you to select the type of record
category you
want to work with. The second line of buttons is associated with connecting to
various websites using your User name and/or password. The second line of
buttons permits you to Edit/View, create a new record or delete an existing
record of the type selected on the first line. The third row of buttons are
associated with special operations and license information. The pull-down at the
bottom of the window will list the names that you have given to each of the
record types you have defined. Once you have selected a record type from the top
row of radiobuttons, then selected the specific record from the pull-down list
you can then use the desired buttons from the buttons in row 1 or row 2.
Internet Record
When connecting to secure websites, the majority of people use simple passwords. This is a hackers dream come true, especially on websites that do not allow you to create a custom user name and simply use your email address. In those cases, half the security to your account just disappeared as a hacker only needs to crack your password. On top of that, using a simple password, even if it is lengthy, is no problem for a hacker to crack. The solution is to utilize a random password generator. However, random passwords, especially those that contain special characters are almost impossible to remember. The problem becomes even greater if you us a different password for every website where you have an account, and we hope you do use different passwords for EVERY website.
The answer lies in CredLock. CredLock not only contains a random password generator, it allows you to paste your user name and password directly to the website logon screen. CredLock's name/password generator is fully configurable both in credential length, the type of characters to use in the credential including special characters and punctuation and whether to allow duplication of characters.
The
nature of this type of password generator and the pasting capability will permit
you to create extremely secure names and passwords. Should the website in
question allow you to create your own user name rather than using your email
address, you can use this same password generator to create your user name,
making the combination of both entries a truly secure logon.
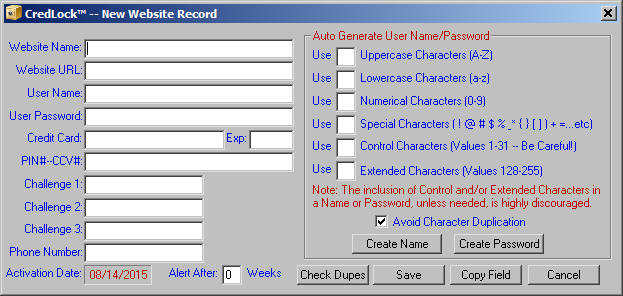
As you can see from the above image, directing you to the right side of the window, are a series of fields whereby you can select the make-up of your user name and/or password (Credentials). Not only can you select what type of characters are contained in your credentials, but the number of each character type simply by entering the desired number of characters in the data field to the left of the character type. Notice the "Avoid Character Duplication" checkbox near the bottom of the record window. By activating this checkbox you are instructing CredLock, when possible given the character types and counts to not duplicate any characters that have been previously placed in the credential.
Now directing you to the left side of the above window, in addition to the User Name/Password generator, are a series of data fields where you can define the website name, path (URL), a site specific credit card number and PIN #. Also, as you know, a number of websites, will ask you to provide the answers to a series of challenge questions that can be used when the website questions the validity of a sign on. The answers that you provide, can be entered into any of the three challenge fields provided.
If you are a believer in changing your credentials on a frequent basis, then you can ask CredLock to advise you after a selectable period of time that you need to modify your credentials. In the lower left-hand corner of the window is a field labeled "Activation Date" which is the date that the record was created and/or modified. To the right of that is the "Alert After" field where you can enter the number of weeks that you wish to retain the existing credential. Setting a '0' into this field turns off the alert for the associated website. If however you enter a number greater than zero, then when that number of weeks has elapsed since the activation date, and you access the website, CredLock will alert you that it is time for you to modify your credentials for this website.
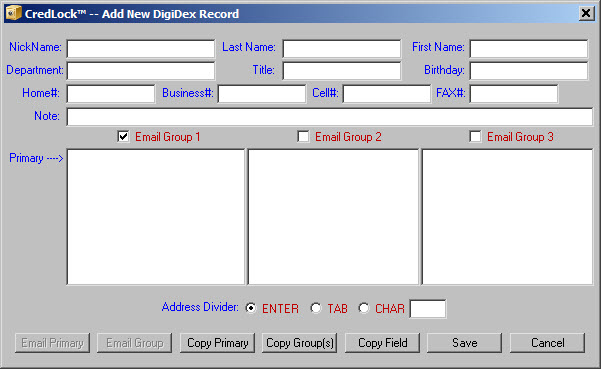
DigiDex™ Record
Credlock's Digidex
record is similar to the old style Rolodex™
system but tailored to manage the data associated with today's digital world. The image below depicts
the Digidex record. You can list individual names and a single email address or
you can list a company and divide its personnel into three groups or departments.
This unique feature permits you to send an email to a given set of addresses
while omitting others. The system will work with either a standalone email
program (Outlook etc.) or a web-based programs such as Roundcube™, SquirrelMail™
or Horde™ among others.
Credit Card Record
Credlock's Credit record permits you to
keep track of each of your credit card accounds including the card provider and
all of the information to the card.

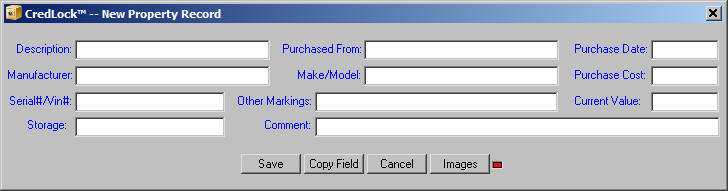
Personal Property Record
Filing insurance claims on personal
property that has been lost or destroyed in a fire or natural disaster or stolen
as a result of a home burglary can be an arduous process as most insurance companies want to see
purchase receipts, appraisal documents and pictures. Possession of this
supportive documentation can make the claim process and eventual reimbursement much easier
on both you and the insurance company; for this purpose CredLock provides a
Property Record category. Here you can list all of the relevant information on any
given piece of personal property from an automobile to a pair of earrings. In
today's digital world, just about everyone has a camera whether it be a camera
alone or as a part of a smart-phone, so taking picture(s) of personal property
should not be an issue for most people. Once you have taken that picture you can
now associate it with the CredLock property record. If you will, notice the
button on the far right of the record labeled "Images" and the small LED to the
right of the button. Once you transfer a picture to the image portion of the
property record when you retrieve the record from the CredLock database the LED
will be green indicating that an image exists. Click the "Image" button and the
Image file is displayed complete with any comments. You can add additional
images to this file at any time. In fact, for appraised articles such as family
heirlooms you can either take pictures of these documents or scan them into the
same image file.
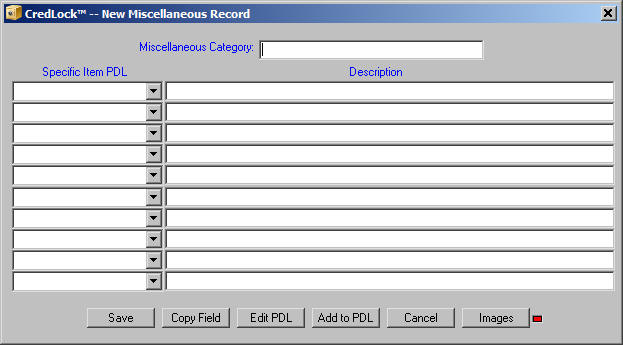
Miscellaneous
Record
The CredLock Miscellaneous Record is
used primarily for tracking inventory or keeping track of collectibles. Each
record consists of 10 entries each of which can have a unique entry. For
example, if you are a coin collector you can create labels like "Pennies",
"Nickels", "Dimes", "Quarters", "Half Dollars" and "Dollars". Once those labels
have been created using the "Add to PDL" button you can then select that label
and in the description field list dates and quantities. In fact you an create a
separate record for each coin type by entering that in the "Miscellaneous
Category" field at the top of the record. For example you could give a record a
miscellaneous category of "Pennies", then select "Pennies" in each of the label
fields and list the dates by years and mint markings. There are numerous uses
for the Miscellaneous Record and its flexibility permits it to be used for just
about any type of inventory or collectible item. You will also notice that as
with the Property Record is has the ability to attach an image file to the
record. A CredLock image file can contain as many pictures as desired along with
explanatory textual content if necessary.
Downloading the CredLock Demo Program
C
redLock will run under all versions of Windows including Windows WinXP(SP2), Vista-32/64, Win7-32/64, Win8-32/64, and Win10-32/64.There are three versions of the CredLock Demo all of which are WinZip™ self-extracting formatted files. Only one of these files needs to be downloaded based on your setup preference. The only difference between the files is where the "CredLock" system folder Credlock will run from wherever it is stored, however for security and protability purposes we recommend that you run CredLock from external (Flash Drive) media. The file names and their creation paths are as follows:
a) CREDLOCK_DEMOV141EXTMEDIA.EXE will create the "CredLock" System
folder in the root directory of the media where it is stored.
![]()
b) CREDLOCK_DEMOV141PROGFILES.EXE will create the "CredLock" System
folder under "C:\Program Files".
![]()
c) CREDLOCK_DEMOV141PROGFILESX86.EXE will create the "CredLock" System folder under
"C:\Program Files (x86)".
![]()
Internet Explorer
Click the pushbutton associated with the Demo File you wish to download. Internet Explorer will open a window that contains a "Save" button with a pulldown arrow. Click the pulldown arrow and then left click on the "Save As" menu entry. When the Windows Explorer window is displayed, open the "Downloads" folder, then click the "Save" pushbutton.
Select the appropriate file, using the "Save As" function, then download the file to the folder of your choice. Once the file has been downloaded, locate the installation file, right click on the file name and then left-click on "Run as an Administrator". If you receive a message from Windows User Account Control asking for permission to run the file, click "Yes". A confirmation message will be displayed asking if you wish to proceed with the installation of CredLock; click "OK".
Mozilla FireFox
Click the pushbutton associated with the Demo File you wish to download. Firefox will open a window containing a "Save" button. Click that button and the file will automatically be directed to the "Downloads" folder on your primary hard drive. After the download has completed click the Firefox download arrow located in the upper right hand corner of the browser window. You should see the file that you just downloaded based on the list (a,b,c) above. Right-click on this filename, then left click on the "Open Containing Folder" button. This will launch Windows Explorer and select the file you just downloaded.
Google Chrome:
Click the pushbutton associated with the Demo File
you wish to download. Chrome will immediately commence downloading the file into
your local "Downloads" folder displaying a download progress window in the lower
left hand corner of the Chrome main window. Once the download is complete,
because the self-extracting file is of type "exe", chrome may display a warning
message that this type of file is not normally downloaded and could be
dangerous. We want to emphasize at this point that all of our installation files
are virus-checked and are guaranteed to be safe for storage and execution. That
said, to the right side of the warning message will be a pull-down-arrow,
left-click it, then left-click the "Keep" menu entry, this will display the file
name in the window. Adjacent to the file name will be another pull-down-arrow;
left-click on it, then left-click the "Show in Folder" menu entry.
Windows-10 Edge:
Click the pushbutton associated with the Demo File
you wish to download. Edge will immediately commence downloading the file into
your local "Downloads" folder displaying a download progress window in the lower
portion of the Edge main window. Once the download is complete, because the
self-extracting file is of type "exe", Edge will display the warning message
"This file is not commonly downloaded and could harm your computer". We want to
emphasize at this point that all of our installation files are virus-checked and
are guaranteed to be safe for storage and execution. Close the warning message
window by clicking the 'X' in the upper right hand corner, then minimize the
Edge browser window.
Installing and Launching the CredLock Demo Program
Locate the demo file you downloaded and placed into the "Downloads" folder of your primary hard disk. If you elected to run the system from your hard disk and you downloaded either of the "Program Files" demo files, simply right-click on the filename then left-click the "Run as administrator" menu entry which will open the Winzip self-extraction window.
NOTE: If you are running File Explorer under
Windows-10 the warning message "Windows Protected your PC" will be displayed
along with a "Don't run" pushbutton. Again, all of our installation files are
virus-checked and are guaranteed to be safe for execution. Within the warning
window left-click the "More Info" statement which will display a "Run Anyway"
pushbutton. Left-click the "Run Anyway" pushbutton.
If you downloaded the external media demo
file, right-click on the filename then left-click the "copy" menu entry. Select
the root directory of your external media, right-click, then left-click the
"Paste" entry, which will transfer the update file to the root directory of your
external media. Next, right-click on the filename, then left-click the "Run as
Administrator" menu entry which will open the WinZip self-extraction window.
The WinZip self-extraction window contains a field labeled "Unzip to Folder" which shows the path where the CredLock System folder will be created. This will vary based on the demo file you elected to download. The final installation operation is to left- click the "Unzip" button. A progress bar will be displayed followed by a confirmation message that 4 files have been unzipped successfully; click "OK", which will also launch the CredLock program.
During the initial demo startup, the CredLock window ( depending on how your screen has been configured), may be hidden behind other windows, so if you do not see the opening CredLock Window, check the taskbar for the CredLock ICON . Left-click that ICON to bring the CredLock main window to the foreground. Because the CredLock demo program is not yet licensed, a window will be displayed indicating that you are in demo mode with an indicator of how many days there are remaining in the demo period.
As a final operation you should create a desktop shortcut to CredLock. To do this locate the CredLock system folder and open it. Within that folder you will find the CredLock.exe application file. Right-click on the file name then hover your mouse pointer over the "Send To" menu item, then left-click on the "Desktop (create shortcut)" sub-menu entry. This should place a CredLock shortcut on your desktop.
To ensure proper operation of CredLock, locate the desktop shortcut to CredLock and right-click on it. When the menu is displayed, left click on "Properties" (bottom of the menu) then left-click the "Compatibility" tab. At the bottom of the compatibility window, find the checkbox labeled "Run this program as an Administrator" and activate it, left-click "Apply", then left-click "OK". You should now be able to launch the CredLock program from the desktop shortcut ICON.
CredLock Demo Period and Product Licensing
CredLock will operate with full functionality for a demo period of 30 days. Each time CredLock is launched you will be advised how many days remain in your demo period. When the 30 day demo period is over, if you have not yet licensed your CredLock product, a message will be displayed advising that you must purchase the nominally priced ($15) license to continue to use CredLock. Within that same advisory window will be a series of steps that will outline how to secure-order your CredLock license. Note: If you do exceed the demo period, even though the CredLock program will cease to function, any data records you have entered and images you have stored will be retained and available once your CredLock product has been registered.
We hope you enjoy your using your CredLock product and hope that you will take advantage of its many features. We are also here for technical support, so if you have any questions concerning the installation or operation of the CredLock product feel free to call us at the number listed below or email us at [email protected].
CREDLOCK_UDV141EXTMEDIA.EXE
![]()
CREDLOCK_UDV141PROGFILES.EXE
![]()
CREDLOCK_UDV141PROGFILESX86.EXE
![]()
Operationally, there is no between the update file associated with each of the
update buttons. The choice of which file you download only determines where the
update files will be stored when the self- extracting file is expanded.
If you are using
external media (Flash or Hard Drive), save the "External Media Update" file
directly to the media root directory where the CredLock folder is located.
If your CredLock folder is located in the "Program Files (x86)" folder, save the "Program Files (x86) Update" file to the "Downloads" directory of your primary disk drive.
If your CredLock folder is located in the "Program Files" folder, save the "Program Files Update" file to the "Downloads" directory of your primary disk drive.
Once the update file has been downloaded, if CredLock is running, shut it down. Next, locate the update file, and right-click on the update file name, then left click the "Run as administrator" menu entry, which will display a WinZip extraction window. Click the "Unzip" button to begin the extraction and routing process of the update files to your existing CredLock folder located in the root directory of external media or the "Program Files" or "Program Files (x86)" folder on your primary hard drive. Files contained in the update packet will automatically overwrite the existing files in your CredLock folder. The update process does not modify your database files in any way.
![]()
Contact Information
Tech Support --
Postal Address -- 5560 Jackson Loop NE -- Rio Rancho, NM 87144
For Comments or Questions, Please Use Our Contact Form